
General information
Congratulations on your purchase of a Nokia mobile phone. Your phone
provides many functions which are practical for daily use, such as a digital
camera, a video recorder, messaging, e-mail, a clock, an alarm clock, a
calculator, and a calendar. A variety of Xpress-on™
color covers are also
available. Your phone can connect to a PC, laptop, or other device using a
data cable, Bluetooth technology, or the built-in IR port. For more information
on connectivity, refer to the PC Connectivity Guide. The PC Connectivity
guide, Nokia PC Suite, and all related software can be downloaded from
the U.S. Mobile Phone products section of www.nokia.com.
• REGISTER YOUR PHONE
Make sure to register your phone at www.warranty.nokiausa.com or call
1-888-NOKIA-2U (1-888-665-4228) so that we can serve your needs
better if you should need to call the center or have your phone repaired.
When you register your phone, you can sign up for Nokia’s e-newsletter,
Nokia Connections. You will receive tips and tricks on using your phone,
accessory information, and special offers.
• UNDERSTAND YOUR PHONE
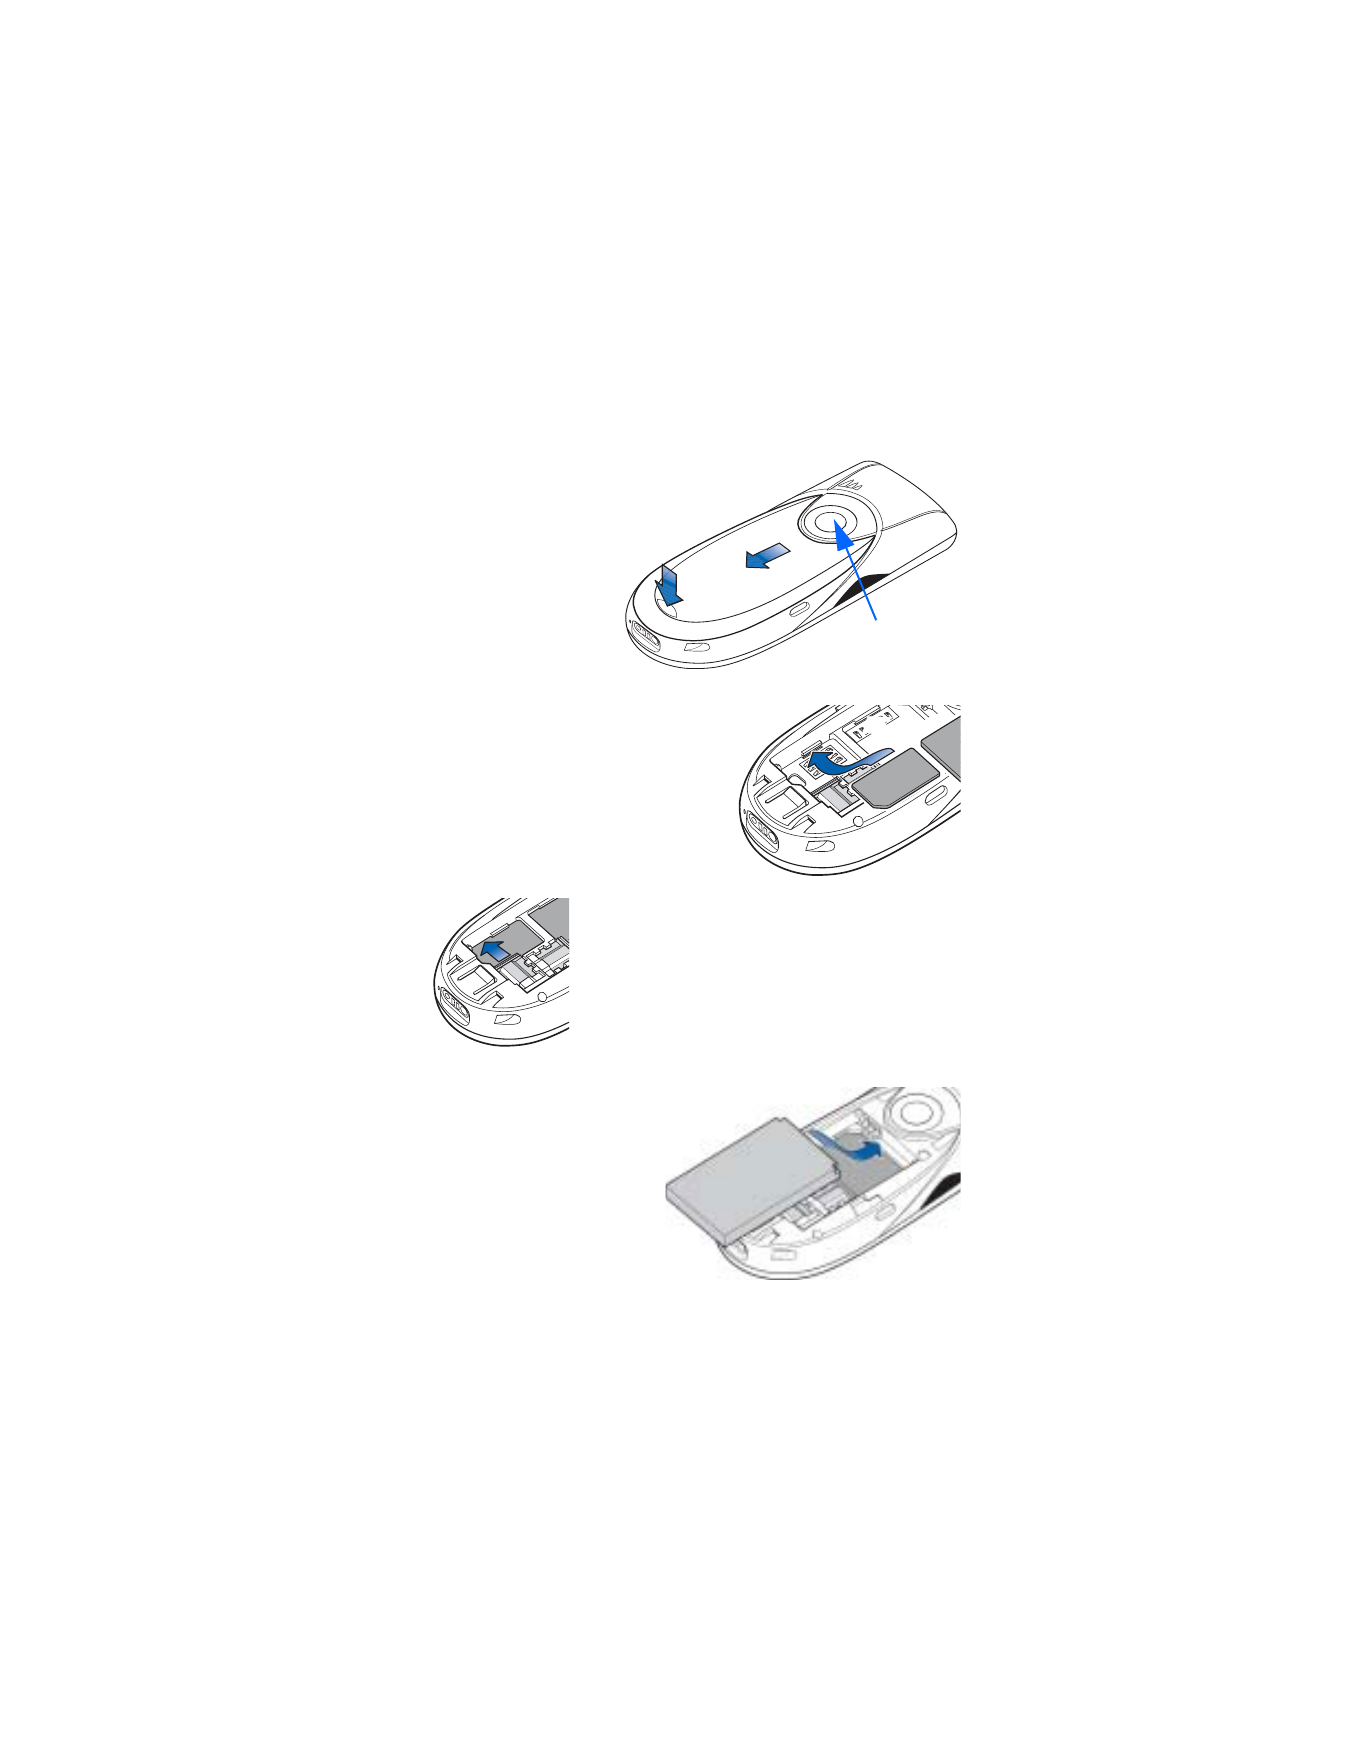
Insert the SIM card and load the battery
Important: Keep all miniature SIM cards out of the reach of small children.
Note: Before removing the covers, always switch off the power and
disconnect the phone from the charger or any other device.
Always store and use the phone with the covers attached.
[ 6 ]
1
Open the cover with
the back of the phone
facing you. Press the
locking catch (
1
) in
the direction of the
arrow and slide the
cover (
2
).
2
Remove the battery
and find the SIM card
slot (
3
).
3
Place the SIM card carefully into the
slot. Make sure that the beveled corner
on the SIM card faces the bottom of
the phone and that the golden contact
area on the card faces downward.
4
Slide the silver catch over the SIM card to
secure it. (
4
).
5
Replace the battery (
5
).
Align the golden contacts
of the battery with the
corresponding connectors
on the phone, and push the
opposite end of the battery
until it snaps into place.
Replace the cover.
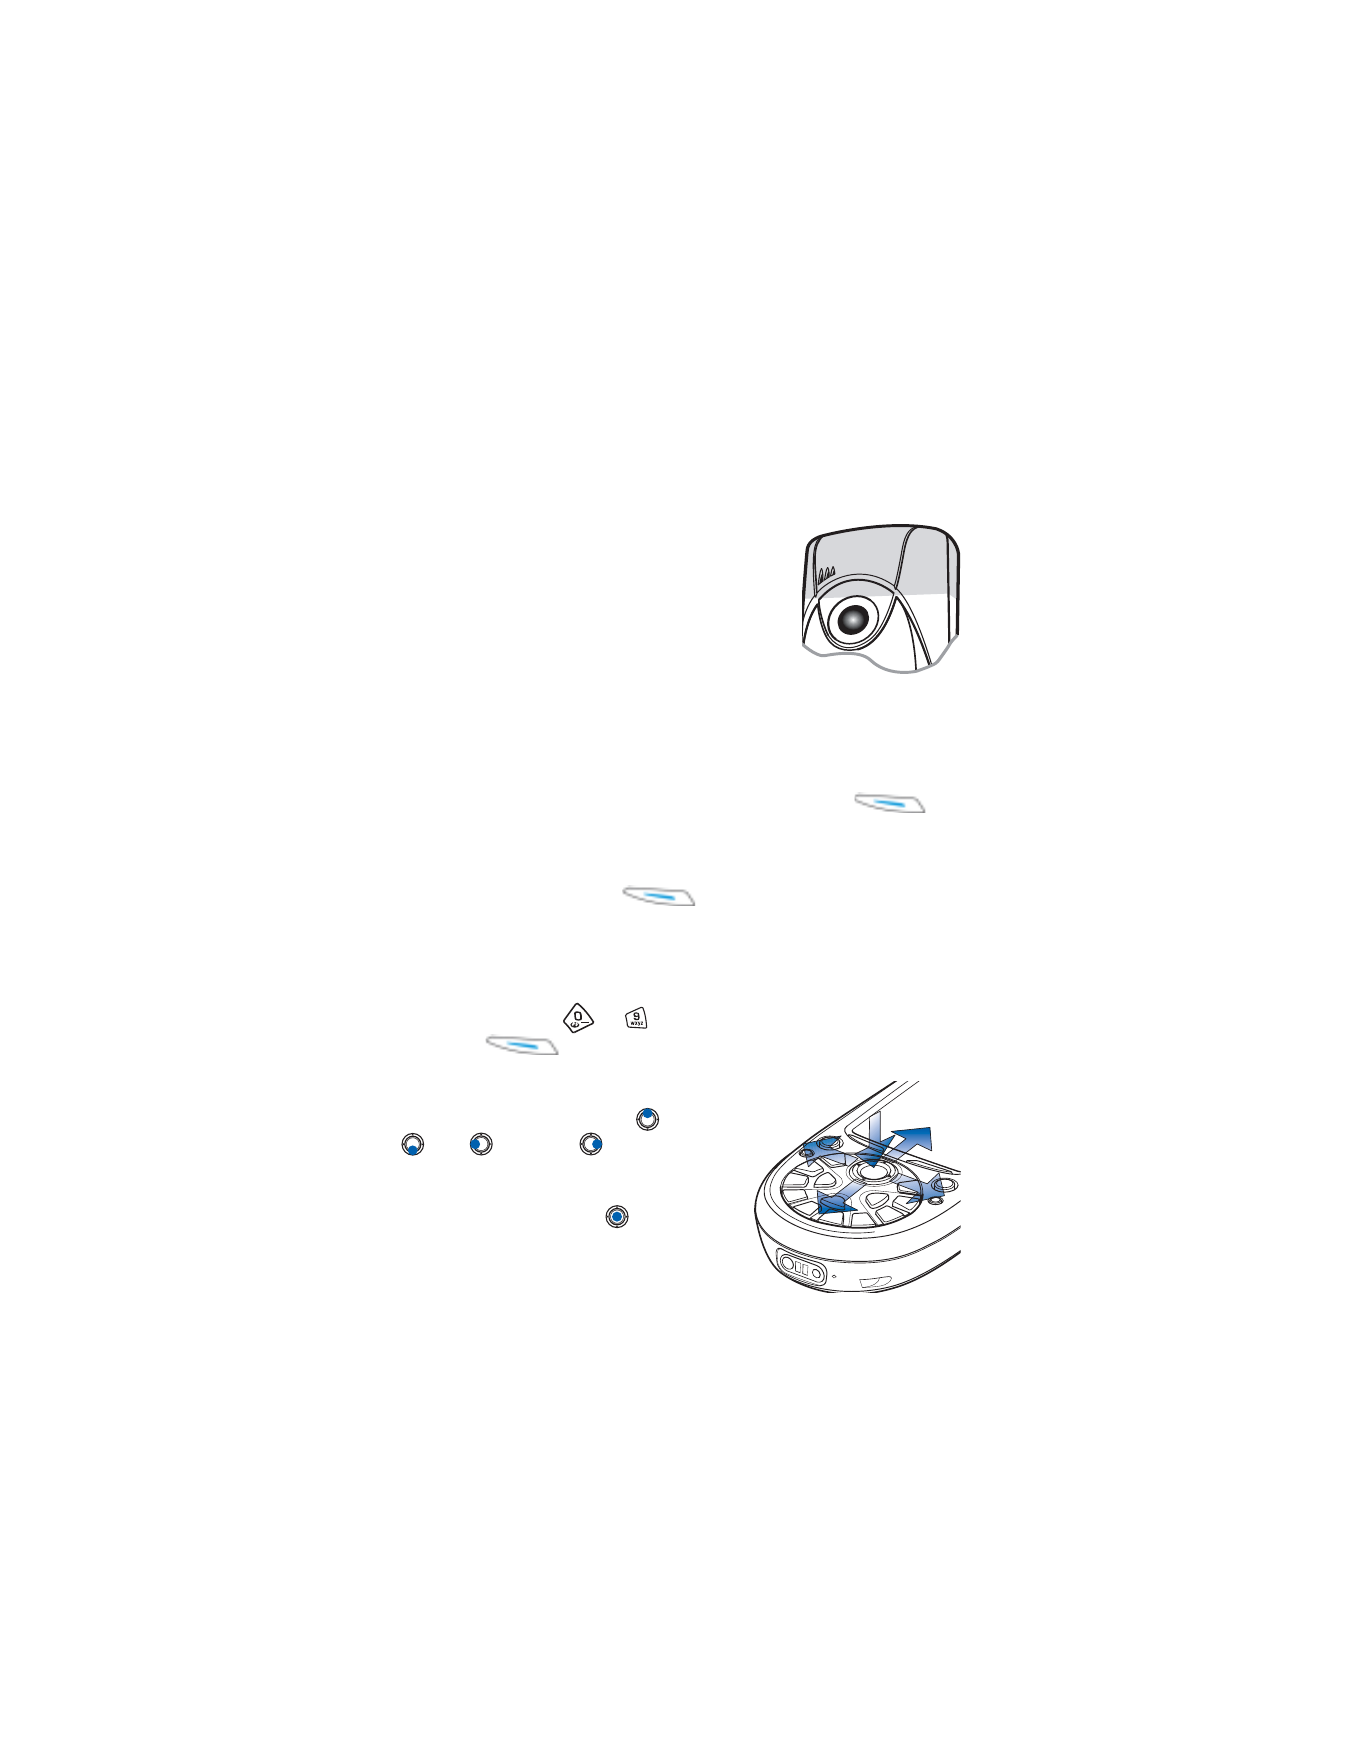
Camera lens
1
2
3
4
5
[ 7 ]
General information
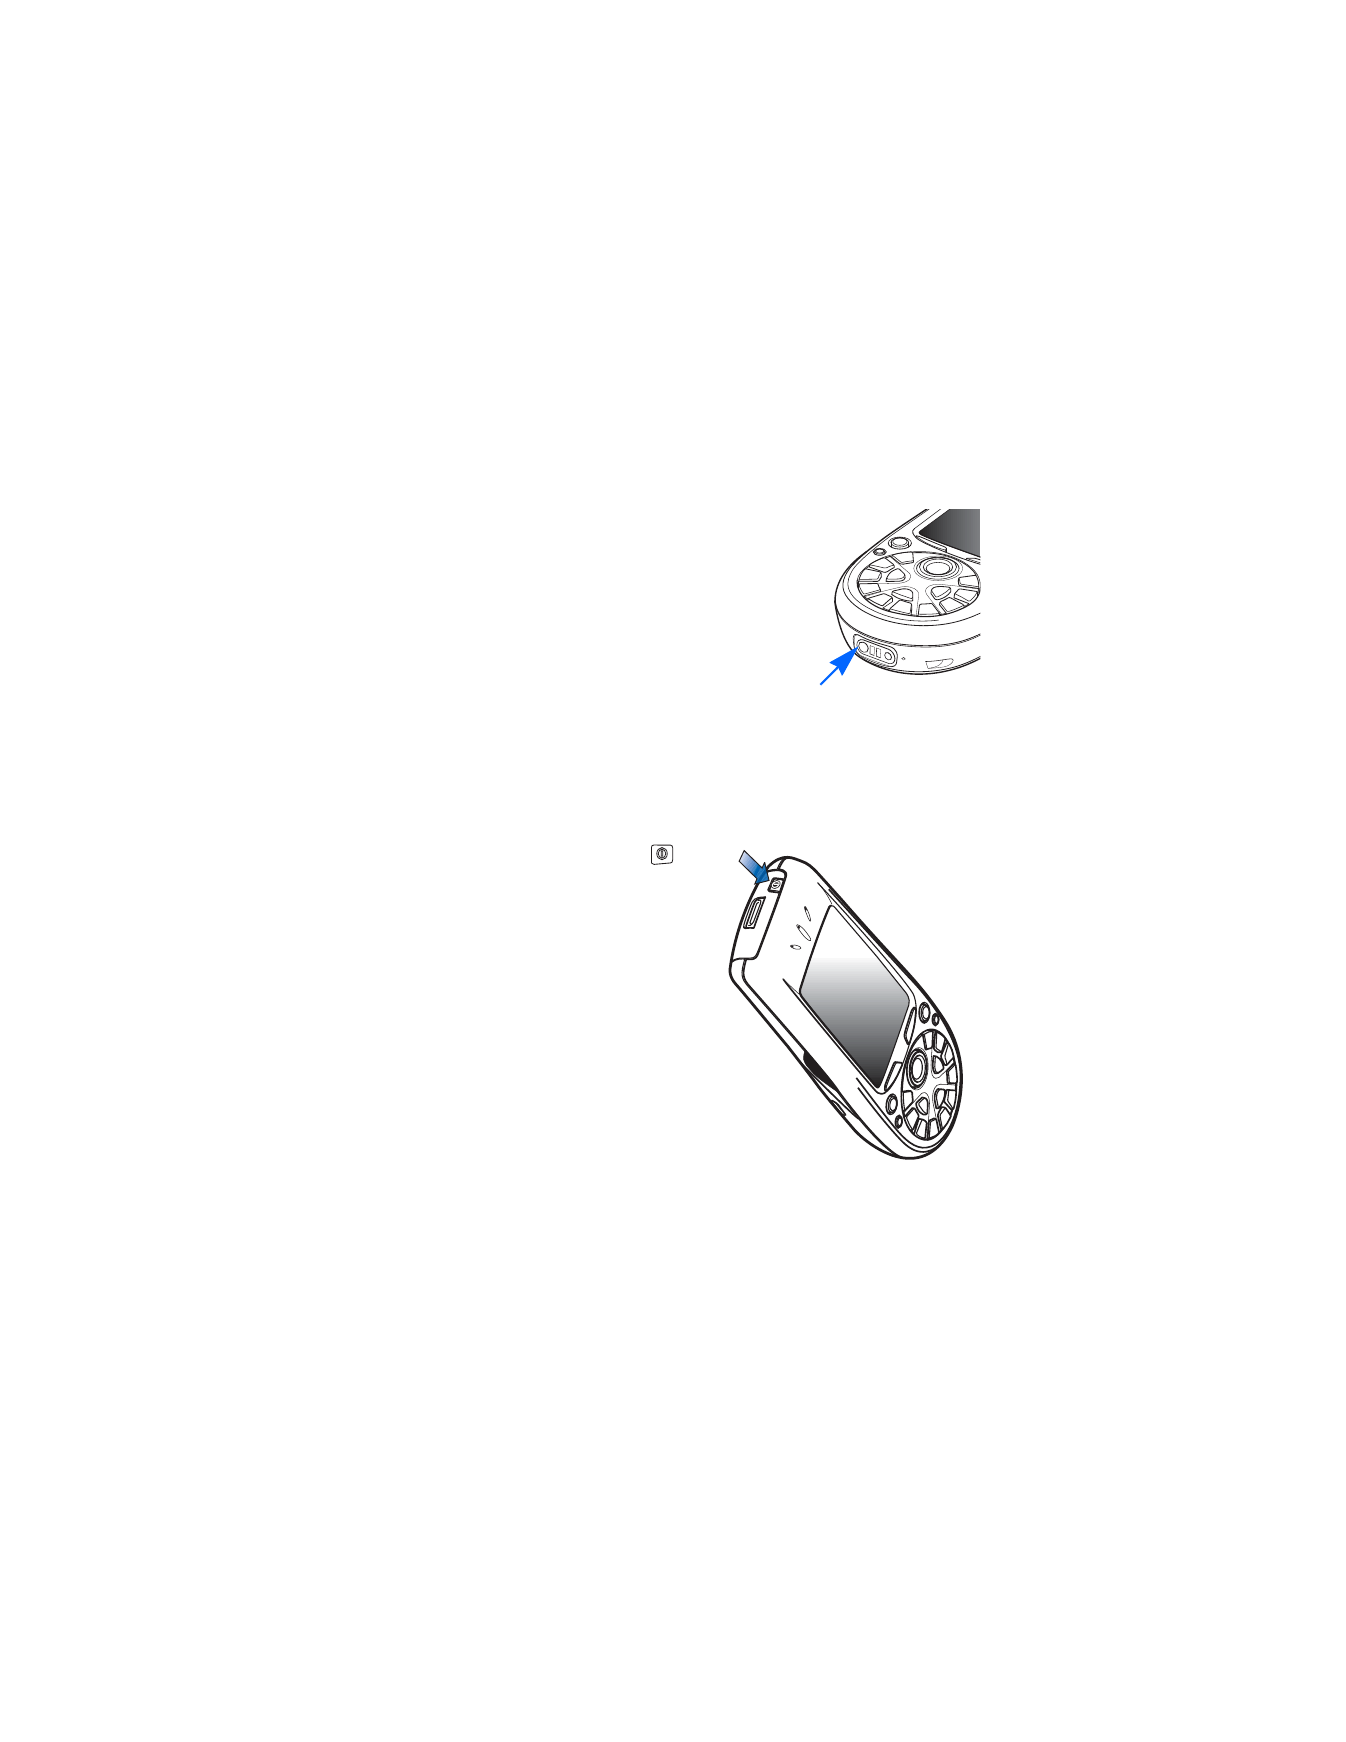
Charge the battery
1
Connect the lead to the charger. You will hear it click into place.
2
Connect the charger to an AC wall outlet.
3
Connect the lead from the charger to the
base of the phone (
6
). The battery indicator
bar starts scrolling. Note, that you can use
the phone while charging.
4
When the battery is fully charged, the bar
stops scrolling. Disconnect the charger
from the AC outlet and then from the
phone. See also “Battery statements” on
p. 158 in the User Guide.
Note: Remove the battery only when the phone is switched off.
Switch the phone on or off
Press and hold the power key
located on top of the phone.
Warning: Do not switch on the
phone when wireless
phone use is prohibited
or when it may cause
interference or danger.
6
[ 8 ]
Antenna
Your phone has a built-in antenna (gray area in
picture). As with any other radio transmitting
device, do not touch the antenna unnecessarily
when the phone is switched on.
Contact with the antenna affects call quality
and may cause the phone to operate at a higher
power level than otherwise needed. Not touching
the antenna area during a phone call optimizes
the antenna performance and the talk time of
your phone.
PIN code
The PIN code is usually supplied with the SIM card. If you are requested to
enter a PIN code, Key in the code (displayed as ****) and press
OK
.
Security code
If you are requested to enter a security code, key in the security code
(displayed as *****) and press
OK
.
The factory setting for the security code is 12345. For more information
on the access codes, see “Security” on p. 43.
Time and date
Use the number keys
to
to key in the current time and then the
date. Press
OK
to accept the settings.
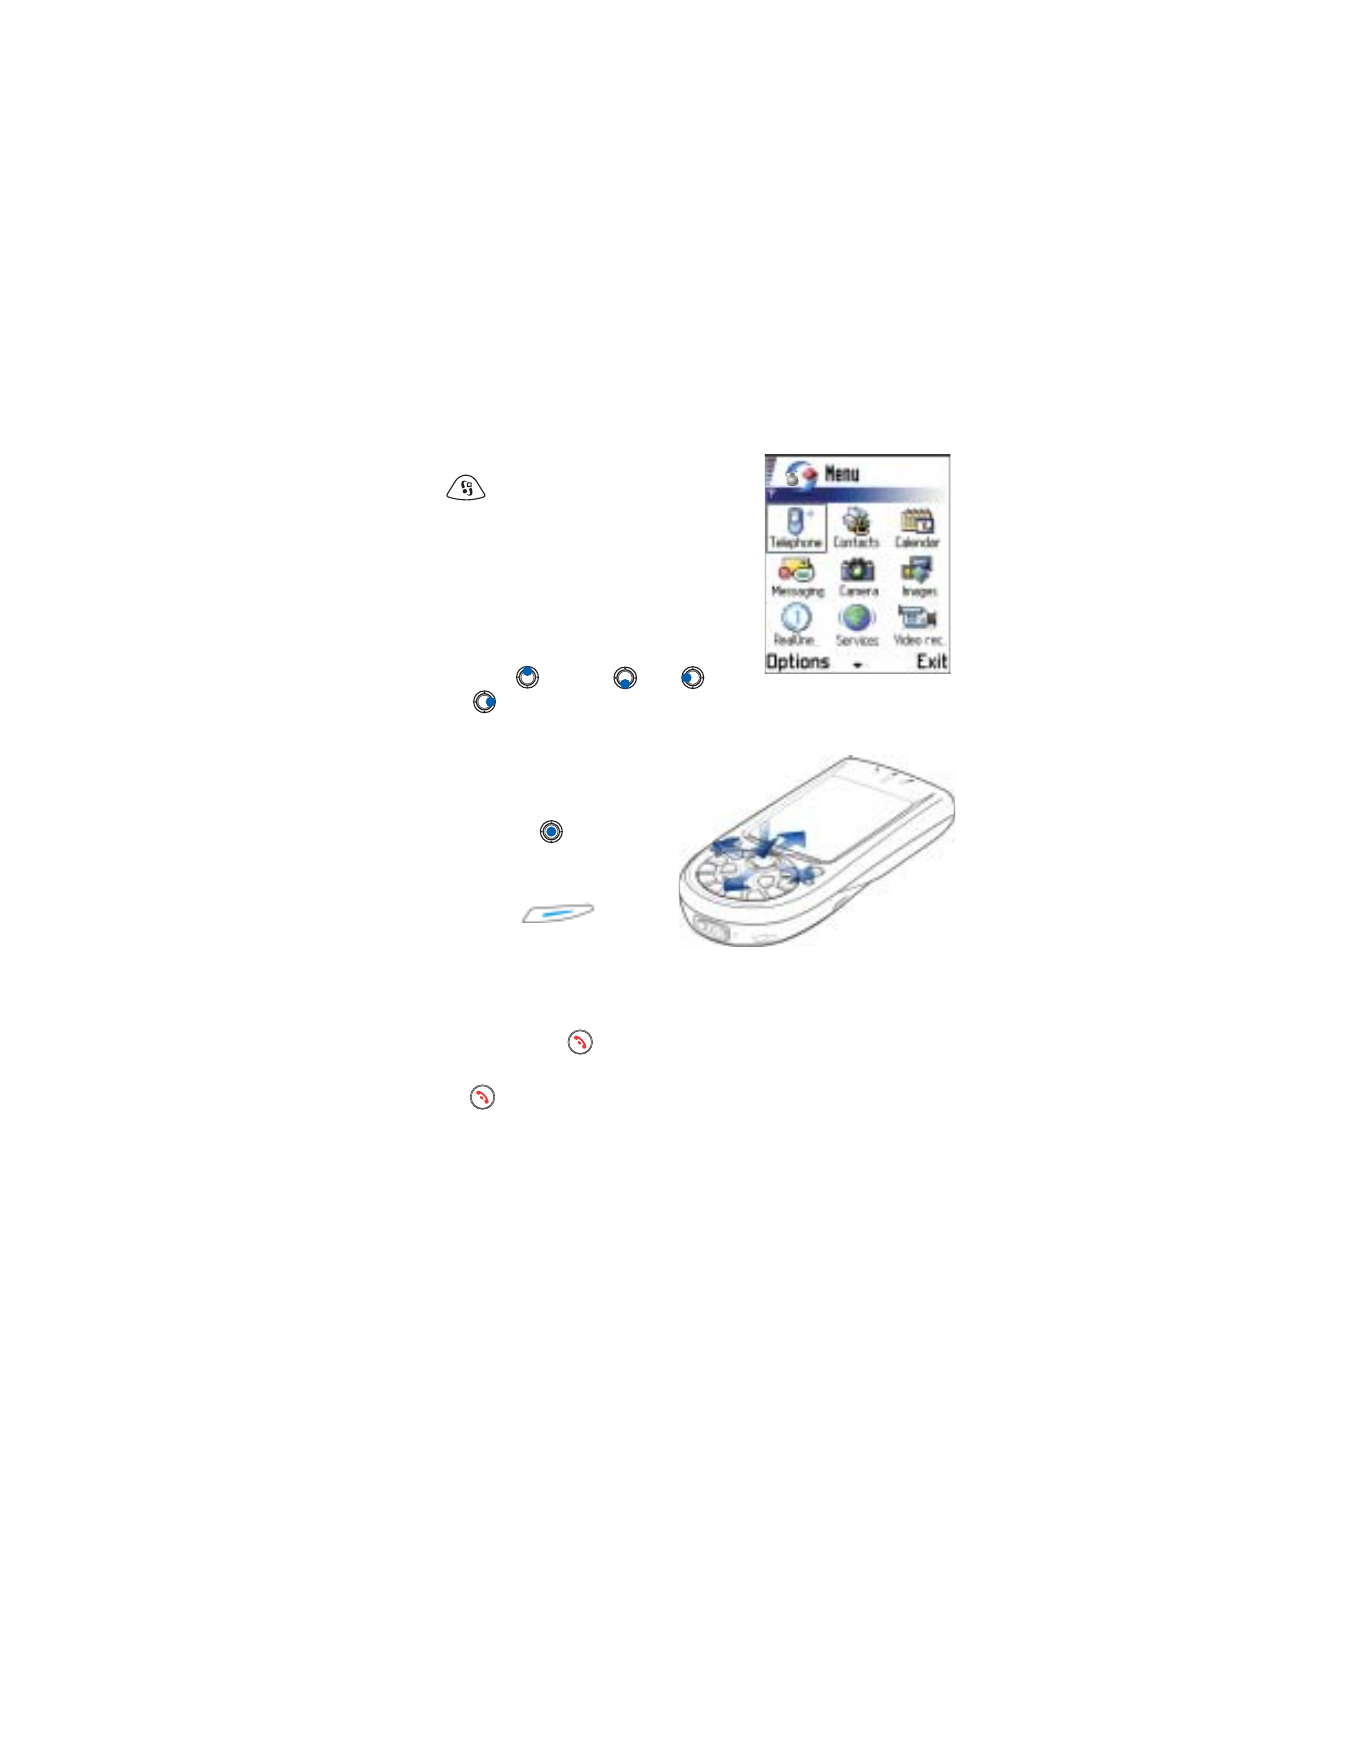
Use the Scroll key
Press the scroll key on the top
, bottom
, left
and right
(shown with
blue arrows 1 to 4) to move in the Menu.
Scroll to an application or a folder and press
the scroll key in the middle
(shown with
blue arrow 5) to open it. For example:
1
2
3
4
5
[ 9 ]
General information
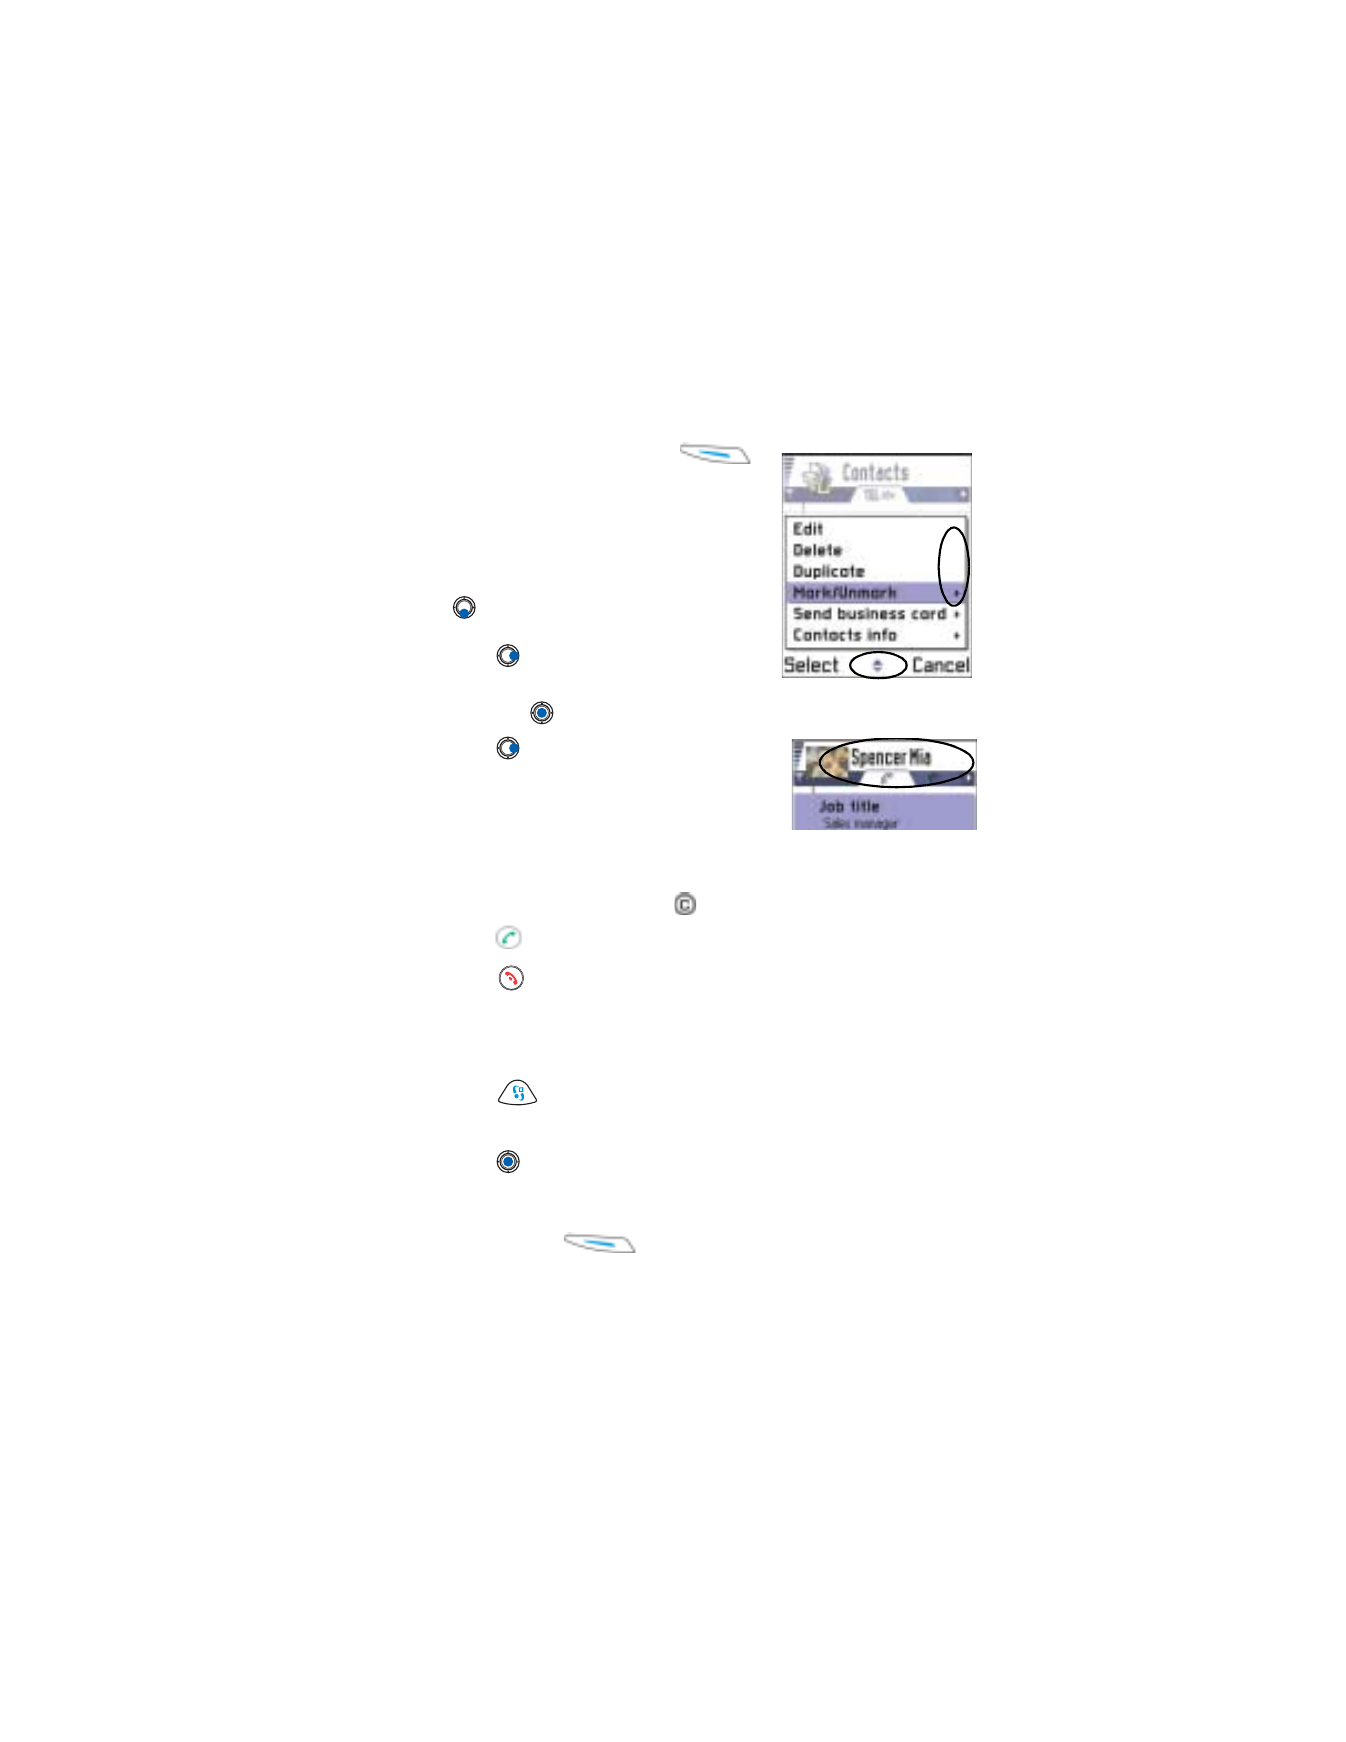
1
To open an Options list, press
Options
. The small arrow at the bottom
of the display (
1
) indicates if the list
contains more items. The lighter the
arrow, the fewer the items left in the list.
2
To scroll down the Options list, press
. A small arrow to the right (
2
)
indicates a sublist. To open a sublist,
press .
To start an action, scroll to a command
and press
.
3
Press
to go to a tab (
3
), a new page,
or view in an application.
Make a call
1
In standby mode, key in the phone number, including the area code.
If you make a mistake, press
to clear numbers.
2
Press
and wait for the answer.
3
Press
to finish the call (or to cancel the call attempt).
Copy from a SIM card to phone memory
If you have stored names and phone numbers on a SIM card, you can copy
them to the phone memory.
1
Press
to open the main Menu.
2
Use the scroll key to move to
Contacts
.
3
Press
to
open
Contacts
.
4
When you open
Contacts
for the first time, the phone asks you if you
want to copy all your contact data from the SIM card to the phone
memory. Press
OK
.
See also “Copy between SIM card and phone memory” on p. 49.
2
1
3

[ 10 ]
Keyguard
Use the keyguard (keypad lock) to prevent the keys from being
accidentally pressed.
To lock: Press
and
. When the keys are locked,
appears
on the display.
To unlock: Press
and
.
When the keyguard is on, press
to answer a call. During a call,
the phone can be operated normally.
Note: When Keyguard is on, calls to the emergency number programmed
into your phone (911 or other official emergency numbers) may be
possible. Key in the emergency number and press
. The number
is displayed after you have keyed in the last digit.
Shortcuts in standby mode
•
Press
to open the main
Menu
.
•
Press
to open a list of the last dialed numbers. You can then press
to view received and missed calls lists.
•
Press
to
open
Contacts
.
•
To change the profile, press
briefly and select the profile.
•
Press
and
to call your voice mailbox. See “Call your voice
mailbox” on p. 21.
Shortcuts in editors
•
Press
to open a list of commands related to writing and editing
text. Press
to switch between predictive, traditional text input
and number mode (
Predictive text
→
Predictive text on
,
Alpha mode
,
Number mode
).
•
As you write, press
repeatedly to access different kinds of special
characters, or press
to open a list of special characters.
•
Press
to enter a space.
•
Use
to mark items. Press and hold
and at the same time, move
the scroll key to mark text to be copied or erased.
[ 11 ]
General information
Other shortcuts
In the main Menu, press and hold
to view all the applications that
are currently open. From this view, you can switch between applications
by scrolling to one and pressing
.
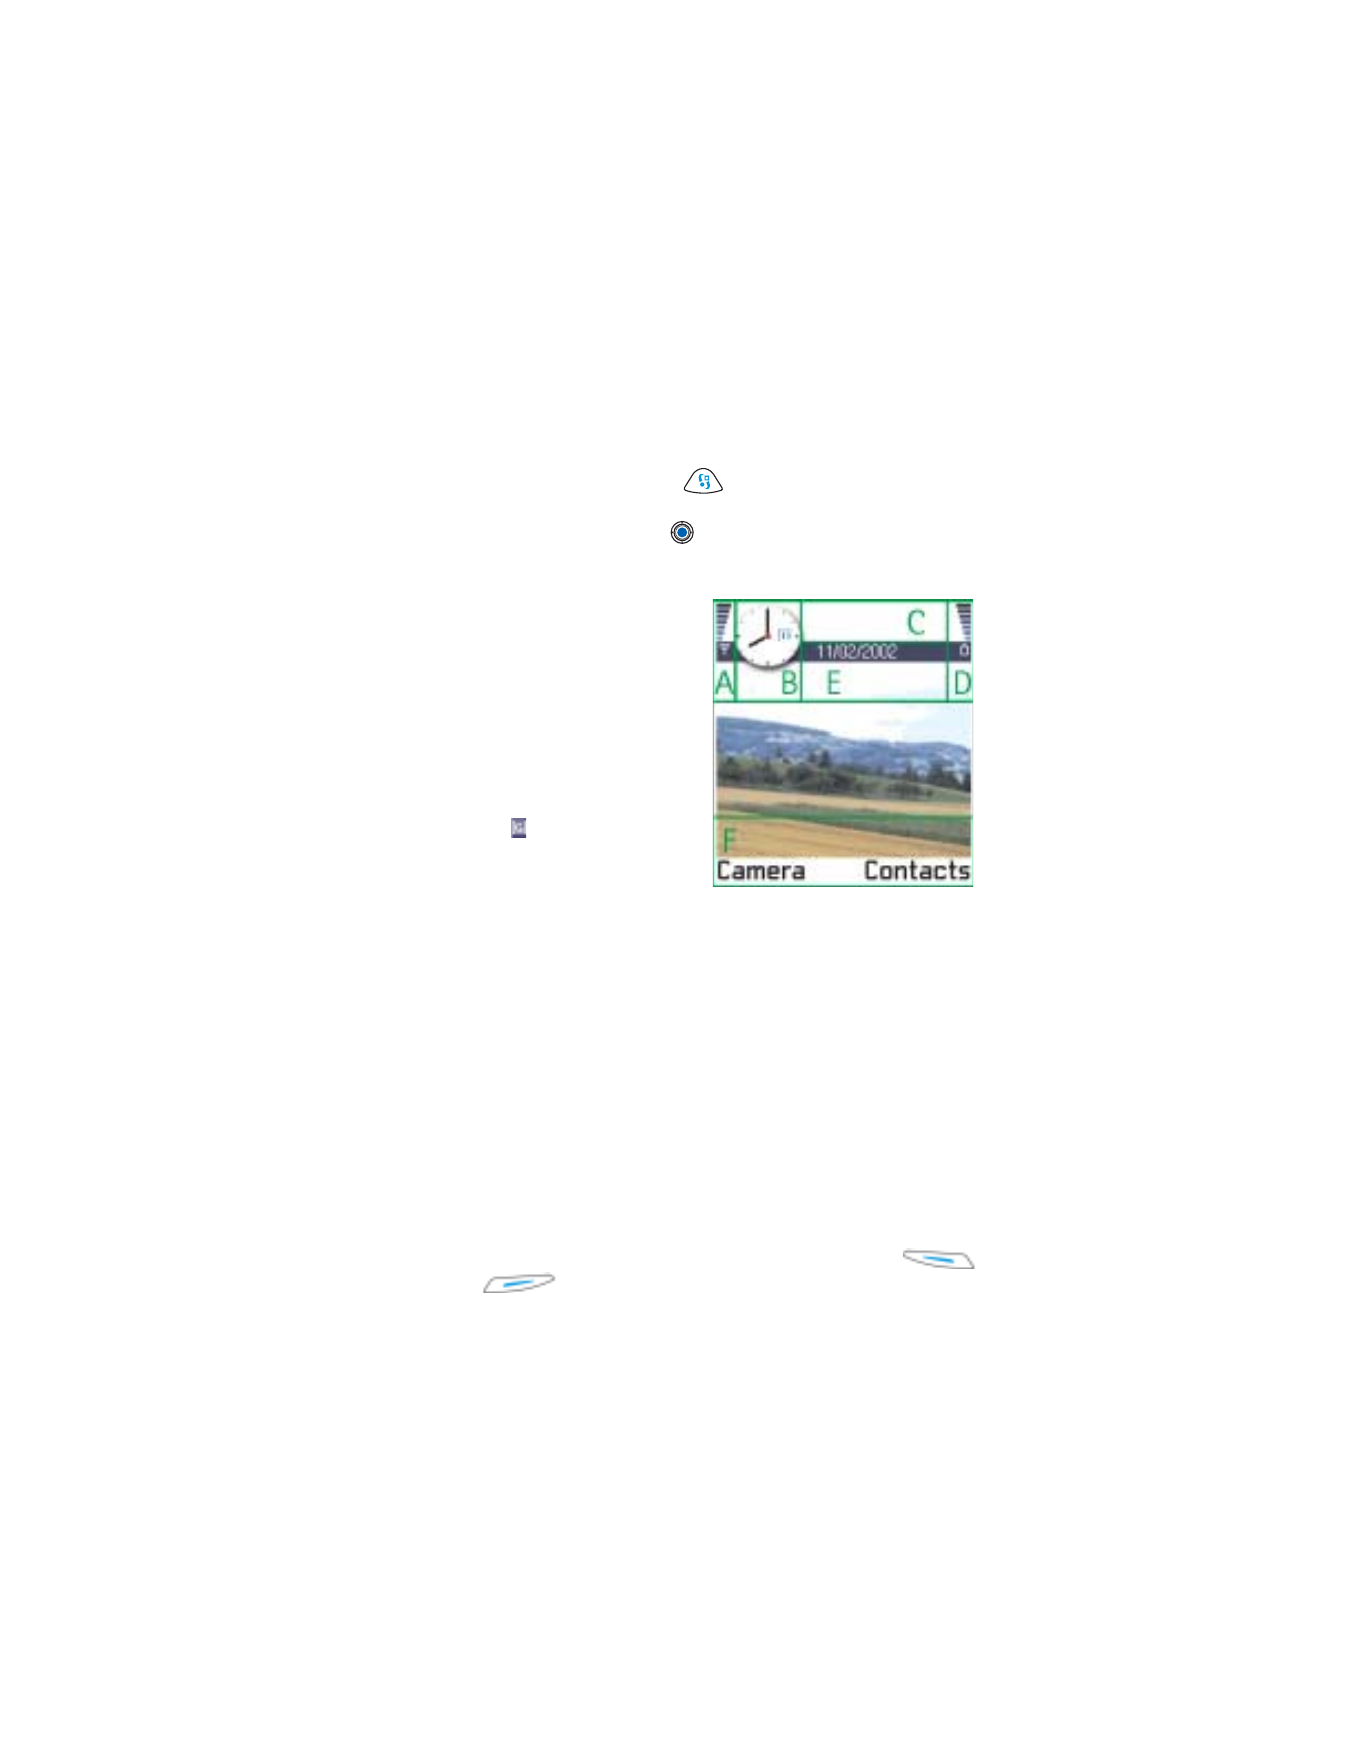
Standby mode
The indicators described are shown
when the phone is ready for use,
with no characters keyed in. In this
state, the phone is in ‘standby mode’.
A Shows the signal strength of the
cellular network at your current
location. The higher the bar, the
stronger the signal. The antenna
symbol is replaced with the GPRS
symbol
when the
GPRS
connection
has been set to
When available
and a
connection is available in the
system or in the current cell. See “GPRS Packet data” on p. 36, and
“GPRS” on p. 42.
B Shows an analog or a digital clock. Also see settings for “Date and
time” on p. 42 and settings for Background image in “Standby mode”
on p. 33.
C Indicates which cellular system the phone is currently using.
D Shows the battery charge level. The higher the bar, the more charge
there is left in the battery.
E Navigation bar: shows the currently active profile. If the selected
profile is
Normal
, the current date is displayed instead of the profile
name. For further information, see “Navigation bar” on p. 16 and
“Profiles” on p. 104.
F Shows the current shortcuts assigned for the selection keys
and .

[ 12 ]
Note: Your phone has a screen saver. If there are no actions for five minutes,
the display is cleared and a screen saver becomes visible. To deactivate
the screen saver, press any key. See “Display” on p. 33.
Tip: You can change the selection key shortcuts and the background
image. See the settings for “Standby mode” on p. 33.
Icons
Several icons may appear on the main screen while the phone is in
standby mode. The icons that are displayed depend on whether they
are related to activity, data connections, or accessories.
ACTIVITY INDICATORS
One or more of the following icons may be shown to indicate that an
activity has occurred:
Indicates that you have received new messages to the Inbox in
Messaging. If the indicator is blinking, the phone memory is low
and you must delete some data. For further information, see
“Memory low” on p. 174.
Indicates that you have received new e-mail.
Indicates that you have received one or more voice messages.
See “Call your voice mailbox” on p. 21.
Indicates that there are messages waiting to be sent in Outbox.
See “Outbox” on p. 95.
Indicates that
Ringing options
has been set to
Silent
and
Message alert tone
to
None
in the currently active profile.
See “Profiles” on p. 104.
Indicates that the phone’s keypad is locked.
Indicates that you have an active alarm. See “Clock” on p. 118.
Indicates that Bluetooth is active. Note that, when data is
transmitted via Bluetooth,
is shown.

[ 13 ]
General information
DATA CONNECTION INDICATORS
•
When an application is establishing a data connection, one of the
indicators below blinks in standby mode.
•
When an indicator is shown continuously, the connection is active.
Note: Check with your service provider for availability of high-speed
data calls.
ACCESSORY INDICATORS
The following icons indicate that an accessory is connected to your phone:
Indicates that all calls to the phone are forwarded. Indicates
that all calls to the phone are forwarded to a voice mailbox. See
“Settings for call forwarding” on p. 24. If you have two phone
lines, the forward indicator for the first line is
and for the
second line
. See “Line in use (system service)” on p. 34.
Indicates that you can make calls using phone line 2 only
(system service). See “Line in use (system service)” on p. 34.
for a data call
for a high-speed data call
shown instead of the antenna symbol when there is an active
GPRS connection
for when the GPRS connection is put on hold during voice calls
for a fax call
for a Bluetooth connection
for an infrared connection
a headset is connected
a loopset is connected
[ 14 ]
• MENU
Press
(Menu key) to open the main
Menu. In the Menu, you can access all the
applications in your phone.
Options in the Menu are: